Step 3: Install Windows
- Windows shall be installed in accordance with the window manufacturer’s installation instructions.
- Where such installation instructions do not address application on walls with FPIS, follow the steps below for installation of integral mounting-flange windows on walls with maximum 1-1/2"-thick FPIS. (These guidelines are also available as a printable Quick Guide.)
- NOTE: Where siding is installed over furring (see STEP 4) and depending on the intended architectural detail desired, the window rough opening may also need to be padded-out with the furring and flashed prior to the window installation so that the window frame and cladding/trim align as intended.
IMPORTANT! READ ALL INSTRUCTIONS BEFORE BEGINNING INSTALLATION
The user of these guidelines is responsible for the following:
-
Determining the suitability of these guidelines for the intended use.
-
Complying with the local building code.
-
Providing the necessary skill to execute a proper window installation.
-
Following the component manufacturers’ installation instructions for the user-specified window product, flashing materials, water-resistive barrier (WRB), foam plastic insulating sheathing (FPIS), sealants, and other materials as required for a complete an effective installation.
-
Addressing any variances from manufacturers’ instructions and product warranty stipulations, including consultation with the applicable product manufacturers or a design professional as needed.
-
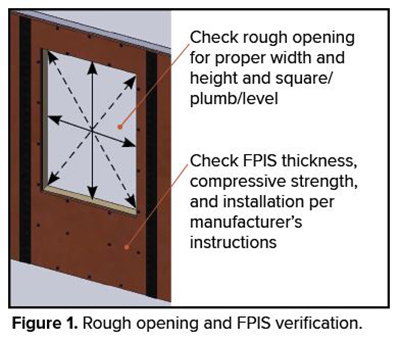
(1) Verify that the rough opening is level, plumb, square, and the size required for the specified window product plus clearance for a rough opening gap as recommended by the window manufacturer (typically the rough opening width and height are ½" to ¾" greater than the window unit dimensions). See Figure 1.
-
(2) Verify that the FPIS is not greater than 1½" thick, has a minimum compressive strength of 15 psi per ASTM C578 or ASTM C1289, and is installed in accordance with the FPIS manufacturer’s installation instructions for a code-compliant WRB application. Where a separate WRB material is provided, the thickness of FPIS is greater than 1½”, or for other special conditions, refer to the section SPECIAL CONDITIONS & ADDITIONAL RESOURCES.
-
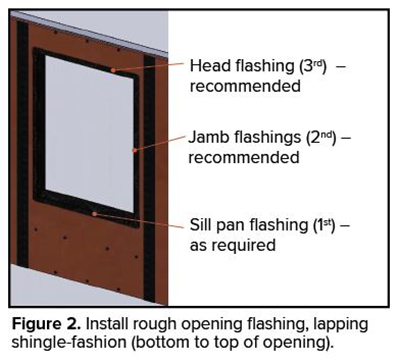
(3) Window sill pan flashing with back-dam, rough opening jamb flashings, and head flashings are a recommended installation best practice. Where used or required, install the rough opening flashing elements in shingle-lap fashion. See Figure 2.
-
NOTE: Self-adhering and fluid-applied flexible flashings (or equal) are typically used for this purpose. Verify that the rough opening size can accommodate the additional thickness of flashing materials and maintain the required rough opening gap. See Item (1).
-
-
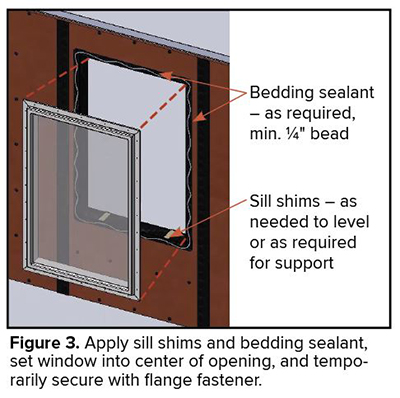
(1) Apply the window manufacturer’s recommended bedding sealant (min. ¼" bead) to the rough opening perimeter approximately ½" to ¾" from the edge of the rough opening. See Figure 3.
-
DO NOT apply bedding sealant to sill flange where sill pan flashing is used. See Step 3B, Item (3).
-
-
(2) Where sill shims are required by the manufacturer or where the sill is not level, shims may be placed and tacked into level position prior to setting the window unit. See Figure 3.
-
(3) With the window closed and in locked position, set into the center of the rough opening and fasten the center nail hole of the top flange to the rough opening with the manufacturer’s recommended flange fastener, or initially secure as otherwise recommended by the manufacturer. See Figure 3. Verify that the required gap between the window head and header is present.
-
(4) Install sill shims (if not previously installed) and jamb shims at locations as required by window manufacturer. Adjust shims as necessary to achieve a square, plumb, and level window installation. Apply shims at window head only where required by the manufacturer.
-
(5) Check operation of the window and then install remaining mounting nail flange fasteners as recommended by the manufacturer. A maximum fastener spacing of 6" is recommended.
-
NOTE: The length of fasteners will need to accommodate the thickness of FPIS and maintain the required penetration through rough opening steel framing materials. Do not over- or under-drive flange screw fasteners. Flanges should be firmly bedded in sealant and not warped out of plane. Clean off any excess sealant. Install any additional frame anchorage as required by the window manufacturer.
-
-
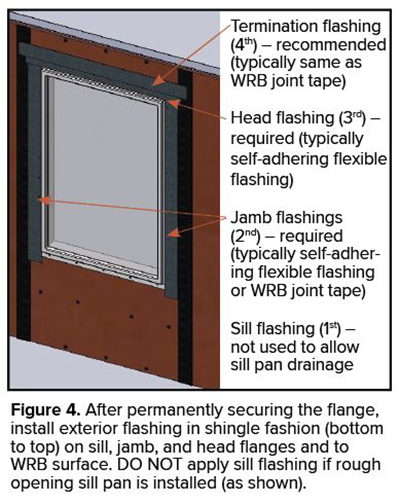
(6) Apply exterior flashing per manufacturer’s instructions to window perimeter in shingle-lap fashion, starting at the bottom and ending with the head flashing. See Figure 4.
-
DO NOT install flashing over flange at sill where a sill pan has been installed in the rough opening. Use compatible flashing materials recommended by the window manufacturer or WRB manufacturer and ensure conditions are appropriate for application (clean, dry, suitable temperature, etc.).
-
NOTE: Self-adhering and fluid-applied flexible flashings (or equal) are typically used for this purpose and must have sufficient width to lap window flange and extend a minimum of 2" onto WRB surface.
-
-
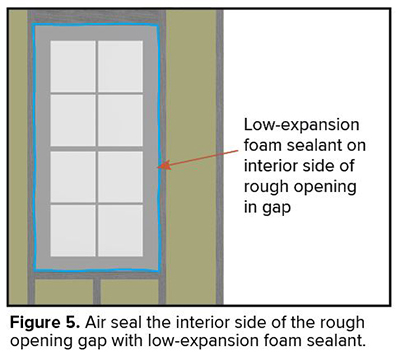
(7) Air seal the interior side of the rough opening gap with low-expansion foam sealant intended for window installation. Avoid gaps or voids in the air seal. A tight interior air seal of the rough opening gap will promote proper drainage and prevent drafty window installations. See Figure 5.
-
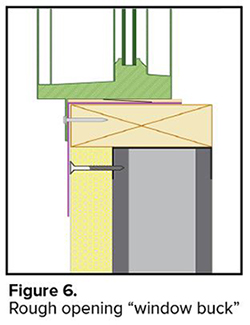
Where the FPIS material is greater than 1½" thick or less than 15 psi compressive strength, or where additional window or door support may be required (e.g., opening width > 6' or design wind load > 35 psf), it is recommended that a rough opening extension be applied to the rough opening. Unless different rough opening extension detailing and materials are required for NFPA 285 compliance based on the type of the building construction, this can be done by use of 2x wood buck (see Figure 6) installed into the rough opening. The window installation and flashing follow the same steps as indicated above. For additional installation guidance on this practice refer to the Window Installation application page.
-
A similar practice may be applied to integral flange door installations; however, door thresholds must be fully supported by blocking or rough opening extension as described above. In addition, where door frame or door hinges are required to be anchored to rough opening framing, ensure the FPIS thickness can be accommodated such that the anchorage fasteners (typically screws) embed into framing material with the minimum required edge distance such that the anchorage screw fasteners penetrate through the steel framing materials by a minimum of three threads.
-
Where a separate WRB membrane layer is installed over or under the FPIS, refer to FMA/AAMA/WDMA 500-16 Standard Practice for the Installation of Mounting Flange Windows into Walls Utilizing Foam Plastic Insulating Sheathing (FPIS) with a Separate Water-Resistive Barrier (WRB) for appropriate installation and flashing details.
- Tape measure
- Level
- Hammer
- Power screw driver with clutch
- Shims
- Sealant*
- Flashing*
- Fasteners*
*Follow manufacturer specifications and installation recommendations as applicable.
For additional information on window installation, refer to the Window Installation application page.
Go Back to STEP 2 Continue to STEP 4 Return to Installation Guide Menu