Step 4: Install Cladding
There are several means for installation of cladding over FPIS with multiple options:
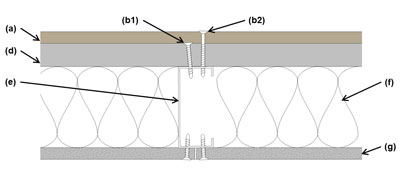
Direct Cladding Attachment Through FPIS

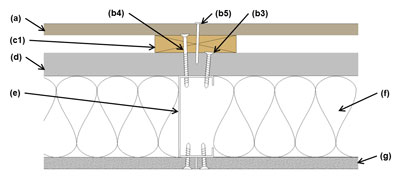
Vertical Furring Attachment (Wood Shown) Parallel to CFS Studs

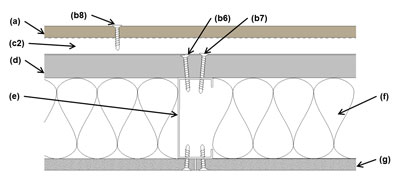
Horizontal Furring Attachment (CFS Hat Channel Shown) Perpendicular to CFS Studs

(b1) Fastener (FPIS to Stud) per FPIS manufacturer
(b2) Fastener (Cladding to Stud) per Table 1
(b3) Fastener (Foam to Stud)
(b4) Fastener (Furring to Stud) per Table 2
(b5) Fastener (Cladding to Furring)
(b6) Fastener (Foam to Stud)
(b7) Fastener (Hat Channel to Stud – fasten alternate or both flanges) per Table 2
(b8) Fastener (Cladding to Hat Channel)
(c1) Wood Furring
(c2) Hat Channel Furring
(d) FPIS
(e) Framing
(f) Cavity Insulation
(g) Wall Finish
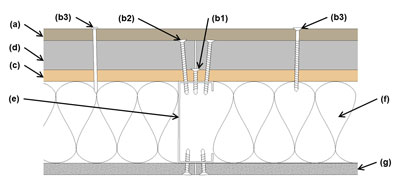
Light-weight Cladding (≤3 psf) Attachment through Maximum 2"-thick FPIS to Minimum 7/16"-thick Wood Structural Panel (WSP) Sheathing

(b1) Fastener (WSP to Stud) per code
(b2) Fastener (FPIS to Stud or WSP) per FPIS manufacturer
(b3) Fastener (Cladding to WSP – nail or screw) per Table 3
(c) WSP
(d) FPIS
(e) Framing
(f) Cavity Insulation
(g) Wall Finish
-
Cladding or furring screw fasteners extending through foam sheathing must be of sufficient length to engage and penetrate through steel framing members by at least three threads.
-
Cladding attachment schedule (fastener type, size, spacing, and length) must be in accordance with approved construction documents or, if not specified on construction documents, in accordance with the more stringent of:
- the cladding manufacturer instructions,
- the cladding attachment specified in the locally applicable building code, and
- the provisions for specifying attachment through foam sheathing found in this Quick Guide: Cladding Connections to Steel Frame Walls with FPIS ci
For additional information on cladding installation over FPIS, refer to the application page on Cladding Connections.